We Checkline Europe B.V. would like to use cookies and similar technologies in order to optimize your shopping experience and this requires your consent. By clicking on the "Accept cookies" button you agree to our use of cookies and similar technologies. If you do not agree, you can refuse the use or customize settings for the respective cookies by clicking on the button "Cookie Settings".You also have the possibility to specify that only certain cookies, which we use on our website, should be activated. This banner will be displayed until you have selected your cookie preferences. If you decide against the use of cookies, we will not use cookies nor similar technologies, except those that are essential for the proper functioning of the website. Click here for our privacy policy

DFX7 Ultrasonic Flaw Detector & Thickness Gauge


Made in the USAThe DFX7 is both, an Ultrasonic Flaw detector, as well as an Ultrasonic A/B Scan Thickness Gauge, in a single unit.

Thickness Gauges are specifically setup to very accurately measure thickness, locate pits, flaws and blind surface corrosion. All the linearity tables, correction curves for various types of longitudinal transducers and features are built with dimensional thickness as its primary focus.

Flaw detectors are designed to detect, size, position, and differentiate between flaw types in various materials and welded joints. A flaw detector must be fast, in terms of its sample and screen refresh rate, as inspectors are generally scanning the surface of a part or test specimen at a relatively high speed, rather than looking for the thickness at a specific point or location. While flaw detectors can also measure material thickness with reasonable accuracy, they are not designed with precision thickness as their primary focus.

The DFX7 combines the two types of gauges into one powerful and full featured instrument, that’s equipped with a number of comprehensive toolkits to provide the user the arsenal necessary to address a number of common field applications.

The DFX7 has the ability to simultaneously measure coatings and material thicknesses while maintaining the ability to locate pits, flaws and defects in the material. Based on the same operating principles as SONAR, the DFX7 is capable of measuring the thickness of various materials with accuracy as high as ± 0.01 millimeters, or ± 0.001 inches. The principle advantage of ultrasonic measurement over traditional methods is that ultrasonic measurements can be performed with access to only one side of the material being measured.

There are two versions of the DFX7 series: DFX7 and DFX7+ .

  • The DFX7 is a wide band only gauge, which includes a single wide band filter with a range of 1.8MHz to 19MHz.
  • The DFX7 + includes the same wide band filter,
    but also includes a few narrow band filter options at 2MHz, 5MHz and 10MHz. The wide band option is responsive to all signals within the given frequency range. However, narrow band filters eliminate signals outside of the target filter frequency, and focus on the output of the transducer at the specified frequency.
     

Flaw Detector Features
TRIG:
Trigonometric display of beam path, depth, surface distance, and curved surface correction. Used with angle beam transducers
AWS:
Automatic defect sizing in accordance with AWS D1.1 structural welding code
TCG:
Time corrected gain. 50 dB dynamic range, 20 dB per microsecond, up to 8 points for curve definition
Auto-Cal:
Provides automatic calibration with two reference points
Display Freeze:
Hold current waveform on screen
DAC:
Up to 8 points may be entered and used to digitally draw a DAC curve. Reference -2, -6, -10, (-6/-12), (-6/-14), (-2/-6/-10) dB. Amplitude displayed in %DAC or dB
AVG/DGS:
Automatic defect sizing using probe data. Stores up to 64 custom setups
Measurement Mode:
Pulse-Echo (P-E) measures from 0.63mm to 30 meter
Detection Modes:
Zero Crossing, Flank and Peak
Peak Memory:
For echodynamic pattern determination

Thickness Gauge Features
Pulse-Echo Mode (P-E):
(Pit & Flaw Detection) measures from 0.63mm to 30 meter
Pulse-Echo Coating Mode (PECT):
(Material, Coating, Pit & Flaw Detection): Material: 0.63mm to 30 meter. Coating: 0.01 to 2.54 millimeters
Pulse-Echo Temp Comp Mode (PETP):
(Pit & Flaw Detection) Auto temperature compensation – measures from 0.63 mm to 30 meter
Echo-Echo Mode (E-E):
(Thru Paint & Coatings) measures from 1.27 to 102 millimeters. Will vary based on coating
Echo-Echo Verify (E-EV):
(Thru Paint & Coatings) measures from 1.27 to 25.4 millimeters. Will vary based on coating
Coating Only Mode (CT):
(Coating Thickness) Measures from 0.0127 to 2.54 millimeters. Range will vary +/- depending on the coating
• One and two point calibration option for material & coating, or selection of basic material types
•Auto probe zero, recognition and temperature compensation
• High speed scan up to 50 readings per second
•Audible alarm with hi/lo limits
• Built-in differential mode for QC inspections
•64 custom setup configurations

Specifications
GENERAL-----------------------------------------------------
Size:63.5 x 165 x 31.5mm
Weight:400 gr. with batteries
Case:Extruded aluminum body with nickel plated aluminum end caps (gasket sealed)
Display:1/4 VGA AMOLED color display (320 x 240 pixels). Viewable area 43.2 x 57.6 mm.
16 color pallete, multiple color options, and variable brightness
Screen Refresh Rate:Selectable 60 or 120Hz
Display Views: Flaw Detector: Full wave, +/- Rectified, or RF. Thickness Gauge: Digits, +/- Rectified, RF, or B-Scan
Timing:Precision 25MHz TCXO with single shot 100 MHz 8 bit ultra low power digitizer
Measurement Gates:Two independent gates (Flaw), and three gates (thickness). Start & width adjustable over full range. Amplitude 5-95%, 1% steps. Positive or negative triggering for each gate with audible and visual alarms
Operating Temperature:-10 °C to 60 °C
Environmental:Meets IP65 requirements
Warranty:2 year limited
CALIBRATION-----------------------------------------------------
Automatic Calibration:Longitudinal (straight), or Shear (angle)
Probe Types:Single Contact, Dual, Delay, and Angle
Units:English (in), Metric (mm), or Time (s)
Velocity:256–16,000 m/s
Test Range:7,11 mm minimum, to 30,48 cm maximum at steel velocity. Continuously variable
Zero Offset (Probe Zero):0–999.999 ìs
Material Velocity Table:Contains longitudinal and shear velocities for a variety of material types
PULSER-----------------------------------------------------
Pulser Type:Two adjustable square wave pulsers and receivers
P.R.F.:8 to 333Hz in selectable steps (8, 16, 32, 66, 125, 250, 333Hz)
Pulser Voltage:200 volt peak amplitude, rise/fall time < 10ns into 50ohm
Pulse Width:40 to 400 ns. Selectable step options (spike, thin or wide)
RECEIVER-----------------------------------------------------
Gain:0 to 110dB with 0.2dB resolution. Manual and AGC control
Damping:50, 75, 100, 300, 600, & 1500 ohms
Frequency Bands:DFX7 & 7+: Broadband 1.8 – 19 MHz (-3dB). DFX-7+: Three narrow bands centered at 2MHz, 5MHz, 10MHz
Horizontal Linearity:+/- 0.4% FSW
Vertical Linearity:+/- 1% FSH
Amplifier Linearity:+/- 1 dB
Amplitude Measurement:0 to 100% FSH, with 1% resolution
Delay:0 - 253,75cm at steel velocity
MEMORY-----------------------------------------------------
Log Formats:Grid (Alpha Numeric), or Sequential (Auto Identifier)
Graphics On:8,000 readings, A/B Scan image, & all gauge settings for every reading
Graphics Off:210,000 readings (coating, material, min & max. (Thickness gauge only)
Custom Setups:64 user configurations
POWER SOURCE-----------------------------------------------------
Battery:3x 1.5V alkaline, 1.2V AA Nicad cells, 1.2V AA NI-MH, or other other equivalent power source
Battery life (continuous use):Alkaline (12hrs), Nicad (5hrs), and NI-MH (12hrs), with default settings
CONNECTIONS-----------------------------------------------------
Output:RS232 serial interface. PC software & USB converter cable included
Transducer Connectors:Two LEMO 00 connectors
CERTIFICATION-----------------------------------------------------
Thickness Gauge:Factory calibration traceable to NIST & MIL-STD-45662A
Flaw Detector:EN12668-1 compliant

Downloads

Complete Kit

Kit Includes:

  • Gauge
  • DakView3 PC software & Cables
  • Operating Manuals
  • 4 oz Couplant
  • Carrying case
  • Calibration certificate


Accessories

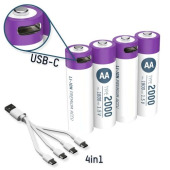
Li-Ion Rechargeable AA Batteries via the USB to USB-C


  • Li-Ion rechargeable battery
  • Stable voltage of 1,5 V over 95% of the runtime
  • Charged via the USB to USB-C cable

More details

Li-Ion Rechargeable AA Batteries via the USB to USB-C 127554

Buy Now
Products

Product
Price
Quantity
134521
DFX-7 Flaw Detector Complete Kit
€ 3.887,00 
134522
DFX-7Plus Flaw Detector Complete Kit
€ 3.701,00 
 
Accessories

Product
Price
Quantity
134523
Carrying Case for DFX-7 Flaw Dectector
€ 96,00 
130266
N-306-0010 RS232 (DB-9 to Lemo) Data Cable 182cm
€ 84,00 
134524
USB-RS232-ADAP- USB - RS232 Adapter
€ 29,00 
135572
CF-AN-250ml Coupling Fluid 250ml Bottle
€ 15,00 
133300
CF-4H High Temperature Coupling Fluid - 316ºC - 118ml
€ 95,00 
133301
CF-4H-950F High Temperature Coupling Fluid - 404ºC - 118m
€ 180,00 
139547
Li-Ion Rechargeable AA Batteries - 4 pcs (with USB to USB-C cable)
€ 25,00 
All mentioned prices are excluding VAT & excluding shipment costs.
Availability: Available: 1 - 3 days, Delivery time: 1 - 3 weeks, special order request

Contact 
Request offer
Your information request is sent!
We'll contact you as soon as possible.
 Information